Tuesday, May 31, 2011

Kevin Connor 5.14.2011 8lbs 3 oz 21 inches

Hey All,

I want to introduce my son Kevin Connor! He was born at 6:23am 5.14.11 weighing in at 8lbs 3 oz and 21 inches long. He is my little angel and is currently the reason why I have been "quiet" with the blog and the studio site as well as my Facebook fanpage. Once I settle into the routine of being a mom I will get back into the studio to get more art done! August 1 marks the date I go back to work full time but as an artist out of my home studio :)

Thursday, May 12, 2011

Rocky Mountain Horse


I saw a Rocky Mountain Horse last year who had the most amazing color. Deep liver chestnut with a nearly silver mane. Very striking, and so I was inspired to create a painting of him. I started it last year and just finished early early this morning (1am). Baby was restless last night and I wasn't able to sleep comfortably so I killed time by making art! What else can I do at that time in the morning while I wait for this stubborn little boy of mine to make his appearance into this world!

Tuesday, May 10, 2011

Shadow Horse Studios LLC's First Ever Digital Painting Video Tutorial Part II

I just wanted to give another brief update on some the things I am planning to have available for my customers, students, and clients in the upcoming future. I have been diligently learning the ropes of a new video program that will allow me to create online teaching workshops directly from my website. It is my plan at this time to offer Adobe Photoshop, Corel Painter, Prisma Colored Pencil, and watercolor/ink tutorials to start with.

Digital art is what I am mostly known for in the illustration world that I market myself for (equestrian and fantasy focus). My Prisma Colored Pencil and Watercolors/Inks works are what my collectors are really "digging" right now. I often get a lot of requests to teach my techniques and so I have decided that offering online workshops will be highly beneficial for me and potential students!

The first workshop I am working is an Adobe Photoshop Tutorial with a sketch of an Andalusian stallion that will be downloadable for all who sign up for the tutorial, which they will use to follow along with the tutorial step by step!

Sneak Peak of things to come

The Sketch We Will Start With


What the Finished Product will Look Like...

It is my hope to teach those of you interested in Digital Art all the tips and tricks of creating TRUE original digital painting WITHOUT cheating and using cloning and smudging on photographs!

New Older Works...

I am patiently waiting for my "overdue" baby to be born! I am anxious and full of anxiety so I have been going through my old scrap works and finishing them up. Also using a few of them to design a few online workshop tutorials for Adobe Photoshop and Corel Painter! I am slowly learning a new video editing program that I am actually enjoying quite a bit :)


Monday, May 9, 2011

Shadow Horse Studios LLC's First Ever Digital Painting Video Tutorial

I just wanted to let everyone know that I am currently working on my first Digital Art Tutorial Video. I will also have this same video made into an easily readable PDF download file a well- complete with working PSD files for your practice. There will be a small lesson fee to download and do this tutorial on your own providing you have all the necessary programs and equipment. I also plan on hosting a critique gallery where students can upload their complete images to share with the option of asking for critiques!This tutorial will be taught on Adobe Photoshop. This tutorial will be designed for those artist who already have working knowledge of Adobe Photoshop as well as a basic to advanced understanding of color theory and painting techniques.

Stay Tuned!!!

Sunday, May 8, 2011

Every Picture Can Potentially Tell a Lie Part III

Just wanted to finish up with the "final" digital painting finish. Total time spent was only 7 hours which in all honesty is barely sufficient, but this was just meant to be a brief demo and vent session for myself and my raging pregnancy hormones! As far as cheating digital artists go, there is also another sneaky trick I have seen employed as well! Using the clone tool set to a "fany schmancy" brush curser, I have seen artist have two images open on their screen, one of the "photograph" they are "painting" and the other of the line drawing sketch they did.

They set the curser to clone over the photograph and use the strokes they are making with their curser on that photograph to paint on top of their "sketch". Which is essentially no different than smudging the "below" photograph onto a top layer using the "sample all layers" choice! 

Well I stop my venting for now and continue on showing my own method for digital painting, which is all hand-done! No cheap tricks here!

This is the final image (followed by the steps):

My horse Crush when he was just 5 years old:
Below is a close up of the head. Remember I duplicated all the folders and then merged the horse folder copy with the horse detail folder copy. This created a single layer of all the "horse layers" combined. I then deplicated this layer so I have "two". Just in case I mess one up!
Below is the same image as above except the "finishing" layer was turned off. So you can see the "roughness".
Below again, is the same image but with the "finishing layer" turned back on.
The image below has the feet detail layer made visible, the finishing layer made visible, the background finish layer made visible, and the horse layer copy 2 made visible. Also notice that the layer has a drop shadow and inner shadow filter applied to the later at a very low % of opacity and set to mulitply, just for added depth.
The finished piece with the backgroun folder turned on so we can how it all works together!
Enjoy!

Every Picture Can Potentially Tell a Lie Part II

This is part two of my little short demo/diatribe, whatever you want to call it it, showing the progression of a digital painting. I think it is very important for the art collector and those who deeply appreciate art to see the work and effort that goes into making a digital work of art. It is also important to not be fooled by digital painting as it can be "easily" faked. I am seeing it more and more and sadly the older generations of artists and collectors who are not so "tech savvy" as the younger generations are, are unaware of this.

I am seeing far too many digital fine artists out there simply calling a "photograph" a digital fine art painting, when all they have done is created a digital fine art photograph! While their work may look painterly and hand-done, and albeit beautiful, all the artist has really done is put a photo on the base layer in Photoshop or Corel Painter, and used the smudge tool with varying different brushes and the sample all layers choice with additional layers on top of the original photo layer and created what they are claiming to be a "hand-done" digital painting.

I have seen the work of artists who are doing this and unfortunately these artists are living in countries where certain copyright laws are not applicable to them! Sad as it is, they get away with it, even when many of us are recognizing the photography that they are using and literally stealing from the photographer who took the image! The world of copyright law has been keeping an ever vigilant eye on this "dilemma" and because of this, there have been a number of new programs being released that can actually read a digital image.

Believe it or not, every single action you use, stroke you produce, and photograph you use in a digital work of art is all "encoded" into that work. No matter how cut up, spliced, blended, smudged, even if the original layer containing the photograph is removed, the code for every single thing you have already done is embedded into that image and can be read with these programs! So if you are caught using images not belonging to you, you better have permissions and rights granted for the use of those photographs!

You can click on these images to make them larger if you cannot see the layers I have. I have made three folder containing different layers. One for the background on the bottom, one for the horse, and the third for the horse's detail. I also have a new layer called Finish. I get to that new layer is all about in a little bit.
I just wanted to show a close detail of the face. It is still a little unpolished and rough. I do however what to keep that "chalky" painterly feel to this piece.
Here is another close up of the legs, which are not finished, not even close, but because there isn't a significant amount of detail on the legs like there is on the face, there isn't as much for me to do here to make them feel more complete.
I have gone and made duplicates of all my folders and their contents. My purpose of doing this is so I can merge all the horse layers into one and all the background layers into one. I still want to keep all the original layers broken up and separate, which is why I made duplicates. But I have not included the "Finish" layer into these merges. It is still separate!
So for this final screen shot before I continue on to Part III of this little tangent of mine, I would like you to notice I still have my original folders, however I merged the contents of the copied horse folder with the copied horse detail folder. Doing so created one layer containing just the horse in its most complete progression. Now I have a horse and a separate background. I will be going in and "polishing" the horse up and the background. Then I will move to the "finishing" stages.

Stay tuned...

Saturday, May 7, 2011

Every Picture Can Potentially Tell a Lie

If You Know Where to Look For The Truth!


Needless to say, I am pregnant and miserable at this particular stage, I was hoping my baby boy would make his way into the world this week, but he seems to have decided that he is quite content in the safety of my womb for now. Being that I am so uncomfortable I spend quite a lot of my time sitting down and relaxing, trying not to think about the discomfort. Anyone who has ever been pregnant knows what I am feeling like!

In an effort to ease my current discomfort I bought a magazine off the rack that I do occasionally like to peruse through. I used to subscribe to this magazine years back but stopped my subscription when the magazine became too predictable and, in my own opinion, appears to market mostly toward “other artists.” It has in my eyes become a magazine where “artists” find inspiration from other artists and not one which draws clients and collectors to their direct market.

I became inspired to discuss digital art once again, after reading an article in this particular magazine about “digital art” and because I was a little baffled by the claim that the artist was digitally painting his/her piece from scratch completely by hand, since this artist didn’t really show his/her digital palette or his/er full reference images, or screen shots. This really bothers me, and I wish this artist would have shown EVERYTHING in his/her repertoire where anyone with expert knowledge in digital arts can clearly see when an artist is using a photograph as the base layer and then using the smudge tool and the “sample all layers” choice selection. I have some major doubts about this particular artist’s claim that his/her work is “all hand done”, especially without showing his/her screen shots and full steps, to prove otherwise. I will not deny the fact that the images this artist creates are in fact gorgeous! I just challenge the claim that this artist "isn't using a photograph as a "base layer".

I didn’t spend 7 years in some of the top art schools in this country being mentored by some of the finest illustrators and artists working in the world today and learning about all the “nifty” tricks of the trade, ins and outs, and the dos and don’ts! I will question any inconsistency I see in someone’s claim or work ethic. My illustration background is rooted deeply in the digital arts realm and can honestly say that many of the programs of today can create amazing works of art without the mess of actual real-life art making products. Adobe Photoshop and Corel Painter are my favorites by far and I use both interchangeably with each other to produce the best artworks I can.

The smudge tool with the sample all layers with the photograph on the bottom layer is a process that is the very well-known “secret dirty trick” to digital painting. I have used it, many have used it, and some of the best in the market have used it. It’s really no secret to any of us who do this work for a living. But honesty and integrity still hold their merits and for an artist to call his or her work “completely hand created” but use a photograph as a base layer is simply lying. In my opinion it is no different than printing a drawing or picture directly on canvas and then painting right on top of that! If you are going to do it, be honest be fair, otherwise you are hurting the reputations those who do not employ such tactics!

Call it what it truly is, digitally manipulated and digitally painted FINE ART PHOTOGRAPHY.

You should also know that one must be careful when telling “others” the work is COMPLETELY done from scratch without the use of photograph. And one must also be careful when using such a method. Why? Because whether you are aware of it or not, there are software programs out there that can in fact read the digital encoding of photographic images not matter how cut, spliced, painted, or smudged the original is, even if the image is used on a “bottom” layer and erased later when the final image is complete. These programs can in fact alert the person scanning the image for the presence of any photography used, right down to the make, model number of the camera, the F-stop, the date, and in some cases even the name of the photographer who took the image. These programs can read this no matter how manipulated the final image maybe!
Artists working exclusively in the “digital fine arts market” will most likely be able to get away with cheating techniques because, well let’s face it, the general public oohing and awing over the artworks really do not have the knowledge or expertise to know any better. Though be warned, the younger generations of collectors and clients are technologically savvy now and also have a bit of a clue, so be extra cautious!

Artists and illustrators working in the commercial art market must be very cautious to this. There are many art directors and art editors who will run their “special” programs and if they find the lie within the picture, the artist had better be able to explain himself or herself and provide proper documentation for the” right of use” with any photograph that they have used that is not taken by themselves, or they may find themself in court with some serious copyright infringement laws being enforced and a fine that can potentially cost over 150K.

That is why if you are working in the digital arts realm; keep all working PDF files on every image you have created. I keep a specific portable hard drive just for this purpose. That way if anyone claims you are “cheating” you can send them the proof and you have documentation of all your steps you used in creating your pieces. Though, I keep my files mostly for using them as instructional tools for teaching lessons, and I would also like to add that I am also looking forward to hosting online workshops in the very near future!
In closing you never know when someone will want to see your stages of work progress. There are a lot of skeptics in the digital art world still so be prepared to defend yourself!

A Sample of Digital Steps in a portrait I am doing of my horse Crush, these are done in Adobe Photoshop...

Step 1: The Sketch, first done on paper, then scanned in and tinkered with a bit using the contrast mode to make my pencil lines really dark. Erased and digitally drawn lines added to turn the sketch into a digital line drawing.
Step 2:My horse Crush is a dapple grey and I knew in my mind what my basic color palette would be to better contrast and show off the dapple grey. I chose purples. I made the background layer a gradient layer from dark purple to a medium purple color.
Step 3: I am "priming" my horse for the painting process. I selected the sketch of my horse then filled it with a light lavendar color using the paint bucket. Then I started painting a light priming color using a wet media brush.
Step 4: I am using the same wet media brush and blocking in the dark dark, almost black, primer. I keep the horses shape selected so I "stay in the lines".
Step 5:Now I am moving onto the basic "blocking in" technique I use. I am blocking in the medium tone with what I call the light prime and the dark prime. It looks goofy right now, but it will all come together. Notice, that I still keep the horse selected so I stay in the lines.
Step 6:I created a folder called "horse" where all the intial stages of the horse will be kept. I am preparing to move onto blocking in the background.
Step 7:While the horse is selected I am going to now select the inverse so I anything I do in the background will stay in the background and not on the horse. I am going to start blocking in the lighter purplish white in the background using a dry media brush.
Step 8:I have kept the horse's shape selected and I am still working the light and now the dark into the background using the dry media brush.
Step 9:Here is what it looks like with the horse's folder layers made all visible.
Step 10:I usually used some found reference to use to look at for "color ideas", which is what I show here. These particular images, one of the being a resin horse by Carol Williams, were chosen because I needed goo reference for the dappling effect. I have photographs of my horse spread out on the table next to my computer to help me with his specific coloring.
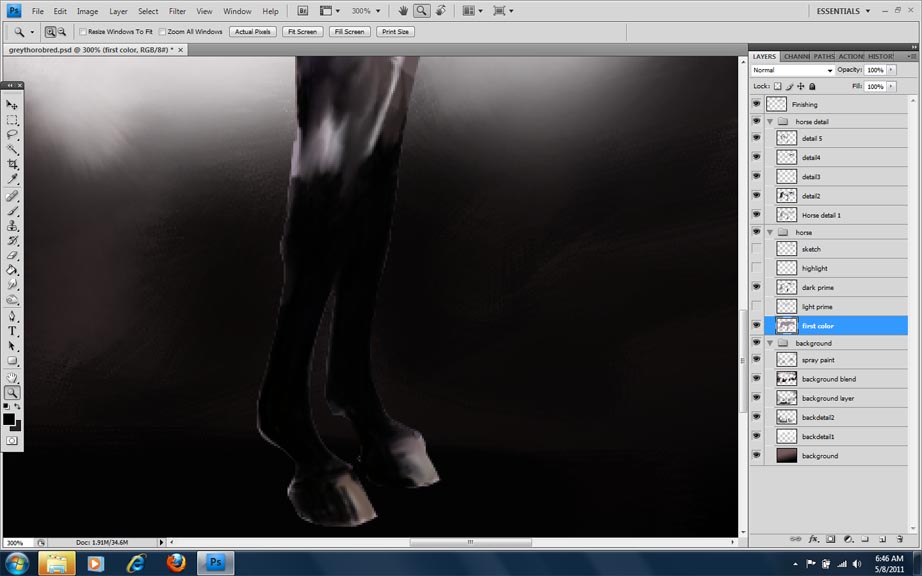
Step 11:I have set up a folder now for the background and the horse and now I am working on the first "detail" layer where I start using my smudge tool. This is going to smooth out all my painting strokes.
Step 12, 13, 14:These next three steps just to demonstrate the time that goes into blending with the smudge tool and how it evolves.

~to be continued~ It is Kentucky Derby Time so I must leave this entry and demonstrate the remainder of this digital painting next time! Thanks for reading!